
The Easiest Way to Build Fancy UI With Cursor, Windsurf, Bolt, or Lovable
Stop asking your AI coding agent to design a website from scratch. Feed it polished components from a library, copy each component's ready-made prompt, and upgrade your site one section at a time.


AI coding agents can scaffold a working website in under an hour. The first version almost always looks plain, generic, and forgettable, not because the model is bad but because it had no design reference to work from. I am Madhuranjan Kumar, and this is the workflow that fixes that problem by feeding the agent proven, polished components rather than asking it to invent a design from nothing. Eight concrete steps that take any AI-generated site from functional to finished.
Use a component library instead of giving the agent a blank-canvas design brief
The root cause of generic-looking AI-generated sites is the prompt, not the model. When you ask an AI coding agent to build a homepage, it defaults to a layout that is statistically common in its training data: a centered title, a subtitle, a call-to-action button, and a block of feature descriptions below. The result is functional and completely unremarkable. Visitors who land on it see a site that looks like every other AI-generated site because it was built from the same implicit design brief: build something that looks like a website.
The fix is to stop giving the agent a blank canvas. A component library is a collection of pre-built, production-quality interface blocks: navigation menus, hero sections, animated backgrounds, content showcases, pricing tables, and call-to-action sections. The components are built on standard web technologies, typically Tailwind CSS and shadcn/ui, which means any modern AI coding agent can work with them fluently. The quality is meaningfully higher than what an agent produces from scratch because each component was designed deliberately by people whose job is UI, not generated statistically from a training distribution.
The practical shift is from "build me a homepage" to "implement this specific component in my homepage." That shift narrows the agent's task from open-ended invention to precise integration, which is exactly the kind of task AI coding agents are most reliable on. They are excellent at integrating well-defined components into existing code. They are inconsistent when the instruction requires aesthetic judgment they do not have a strong reference for.
Copy the component's built-in prompt, not just the markup code
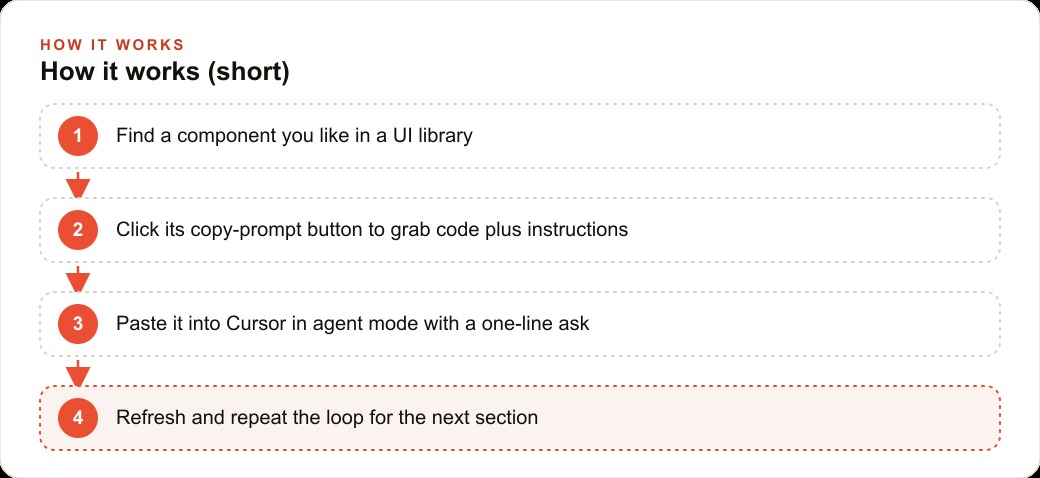
This is the specific detail that makes the whole workflow function at the speed it does. Most developers who discover a component library do the obvious thing: they copy the markup code and paste it into their project, then ask the agent to adapt it. That works, but it misses a crucial feature that the best component libraries now include.
Each component in the library has a copy-prompt button. That button does not copy the raw markup. It copies the complete component code plus a prompt written specifically to guide an AI coding agent on how to integrate that component correctly into an existing project structure. The prompt explains which files to modify, how to handle dependencies, where to place the component in the page layout, and what configuration decisions the agent needs to make.
That distinction changes the error rate significantly. When you paste raw markup, the agent has to infer how it fits into your specific codebase. When you paste the component-ready prompt, the agent has explicit instructions written specifically for agent-assisted integration. The difference in the number of rounds needed to get a working result is large. In practice, a component that takes two rounds of iteration with raw markup takes one round with the component prompt. Over ten sections of a page, that difference is an hour of saved time.
Upgrade one section at a time, working from the top of the page to the bottom
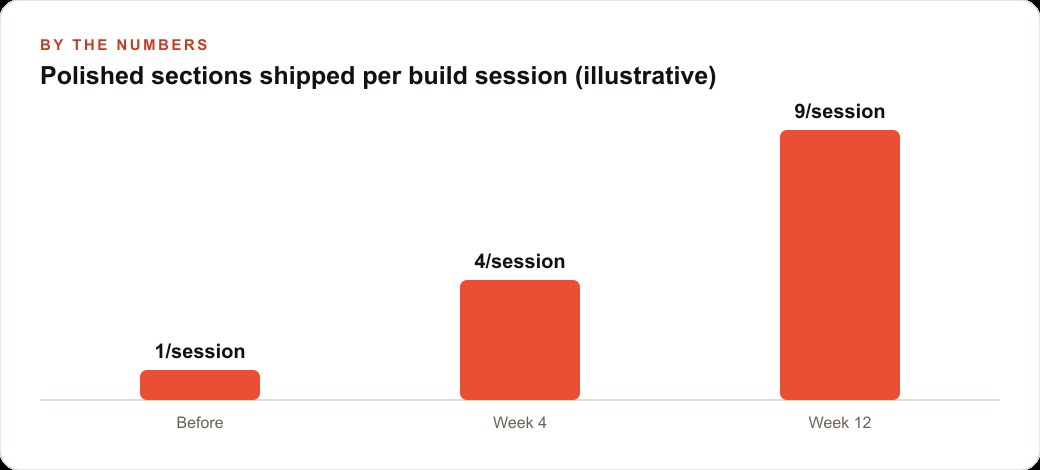
The instinct when upgrading a site is to do everything at once: paste all the component prompts, ask the agent to apply them all, and review the final result. That instinct produces sessions that are hard to debug when something goes wrong because you cannot isolate which change caused the problem.
The right sequence is top to bottom, one section per iteration. Start with the navigation, because it sets the visual register for everything below it and appears on every page. Find a navigation component you like, copy its prompt, paste it into the agent in agent mode with a one-line instruction specifying what to replace, and refresh the browser to see the result. Review it, confirm it looks right and functions correctly, and then move to the hero section.
Working section by section creates a clear checkpoint after every change. If the hero section breaks after you implement it, you know exactly which component caused the issue and you are not sorting through five simultaneous changes trying to find the source. The total time for the session may feel slower but the actual time to a working result is faster because you are not debugging compounded changes.
The sequence that works for most pages is: navigation first, then hero, then background or ambient styling, then the main content block, then any pricing or offer section, then the footer. Each section sits on a stable foundation from the previous step, and the visual context of earlier sections informs how the later ones need to feel.
Match the component library's tech stack to your project before starting
This is the preparation step that most people skip because it feels administrative, and skipping it causes the most painful debugging sessions.
Component libraries are built on specific technology stacks. The most common for modern AI-agent-built projects is Tailwind CSS combined with shadcn/ui, because both are well-represented in AI model training data and work together cleanly. But if your project was scaffolded with plain CSS, Bootstrap, or a different styling system, a Tailwind component will not slot in cleanly. You will see style conflicts where the component's own classes fight with your existing styles, and the agent will spend multiple rounds trying to reconcile them.
The check is simple: open your project's package.json and look for tailwindcss and any shadcn or radix dependencies. If they are there, the component library will work with minimal friction. If they are not, you have two options. Either add Tailwind and shadcn to your project as a first step before starting the component upgrades, which the agent can do in one pass from a clear instruction, or choose a component library that matches your existing stack.
Five minutes of stack-matching at the start of a component session prevents an hour of style-conflict debugging in the middle of it. That is the most reliable ratio in this workflow.
Let agent mode handle the dependency installation and file wiring automatically
The agent's role in this workflow is not just to paste the component code into the right file. In agent mode, the agent reads your project's directory structure to understand the codebase layout, installs any package dependencies the component requires, edits the relevant component files, and runs its own linter checks to catch errors before you see the output. You do not need to run npm install manually or figure out which import statements need to be added.
This matters because component libraries frequently introduce new dependencies, especially for animation components. A hero section with a motion effect might require framer-motion. An interactive background might require a canvas or WebGL library. An agent in agent mode installs these automatically as part of the integration step.
The practical workflow is simple: paste the component prompt into the agent chat with a one-line instruction, tell it what section of the page you want to replace or add, and let it run. When it finishes, refresh the browser. The component is installed, wired, and visible. The whole loop from paste to visible result takes under three minutes per section once you are familiar with it.
Replace placeholder text and images in every component immediately after it integrates
A component that integrates correctly but still shows generic placeholder text is only half done. The component's layout, animation, and styling are handled by the integration step. The content, meaning the actual business name, the real headline, the correct feature descriptions, and the actual product images, is your responsibility to update immediately after the component lands.
The right time to replace placeholder content is in the same agent session, immediately after confirming the component integrated correctly. While the context is fresh, give the agent a brief: replace the placeholder headline with this text, replace the placeholder subheading with this text, and update the feature descriptions with these three points. That takes one additional agent turn and the result is a section that is both well-designed and properly branded.
Deferring the content update until later in the session, or to a follow-up session, creates two problems. First, the placeholder content is easy to forget, and a deployed site with placeholder text is a credibility problem. Second, the agent loses the specific context of which component was just added and may need re-orientation to find the right file and element to update.
Test each section in the browser after every component integrates before moving to the next
This is the quality gate that separates a smooth upgrade session from a debugging session. After each component integrates, open the browser, navigate to the relevant page, and review three things: does the section look the way you expected visually, does it function correctly if it has any interactive elements, and does it render correctly at both desktop and mobile width.
The mobile check is the one most often skipped, and it is the one that causes the most visible problems. A hero section that looks excellent at 1400 pixels wide may collapse awkwardly at 375 pixels if the component's responsive breakpoints conflict with your existing layout. Catching this immediately after the component integrates means the fix is one agent instruction away. Catching it after five more sections have been added means you need to diagnose whether the mobile layout problem is from the hero, the background, the content block, or the pricing section.
The browser test after every section adds roughly two minutes per component to the session. That two minutes consistently prevents the kind of 30-minute debugging session that comes from discovering a compounded layout problem at the end. Over a 10-section upgrade, the browser test investment is 20 minutes and the time it saves in avoided debugging is typically much more.
Write a brief checklist of what changed before calling the session done
The final step is a 10-minute documentation habit that makes every future session with the same project significantly faster. After completing the component upgrades, write a brief list: which components were added, which sections they replaced, which package dependencies were installed, and any styling decisions that were made to reconcile conflicts.
This list does not need to live anywhere elaborate. A paragraph at the top of a notes file in the project folder is sufficient. The reason it matters is that component-based upgrades accumulate across sessions. A project that went through three upgrade sessions over three weeks has a codebase that the agent no longer has fresh context on. The brief session log gives the agent the context it needs to continue cleanly in a future session rather than re-reading the entire codebase to reconstruct what was done and why.
The log also captures decisions you made in the session that might not be obvious from the code alone. If you chose one background component over another because the first one conflicted with your nav, that decision is not visible in the final code. It is visible in the log. Three weeks later, when you consider upgrading the nav, the log tells you to check whether any background component dependencies change.
Worked example: a freelancer's client landing page before and after the component workflow
A freelancer building a landing page for a local accounting firm uses an AI coding agent to scaffold the initial version. The brief is a clean, professional one-page site with a hero, a services section, a pricing block, and a contact form. The agent builds it in about 45 minutes. The result is functional: all the right sections exist, the form submits correctly, and the page loads fast. The visual quality is forgettable. The hero is centered text on a white background. The services section is three columns with default icon placeholders. The pricing block is a basic table with borders.
The freelancer applies the component workflow. They spend 10 minutes browsing the component library and selecting four components: an animated hero with a subtle text gradient, an icon-card grid for services with hover states, a pricing comparison block with a highlighted recommended tier, and a clean footer with a contact form. They check the project's package.json and confirm Tailwind and shadcn are already installed from the scaffold step.
They work section by section. The animated hero integrates in one agent pass and takes about four minutes from paste to visible result. The freelancer checks it at desktop and mobile width, confirms it looks correct, and moves on. The services grid integrates in three minutes, the pricing block in four minutes, and the footer contact form in five minutes. After each component, they update the placeholder content to the firm's actual copy: the partner's name, the three service tiers with real prices, and the contact details.
Total time for the upgrade session: 45 minutes including the content updates and browser checks after each section. The before and after is dramatic. The before was functional but indistinguishable from any other AI-generated site. The after looks like it was built by a mid-level front-end developer with design taste, because the components were designed by people with that skill and the agent integrated them precisely.
The time comparison tells the full story. Building the same visual quality from scratch, by asking the agent to invent the design without a component library, would take two to three hours of back-and-forth as the agent generated mediocre sections, the freelancer provided feedback, the agent revised, and the cycle repeated. The component workflow collapsed that into 45 minutes because every aesthetic decision was made by the component designer, not negotiated between the freelancer and the agent.
That is exactly what we do at AI DOERS. Book a private 30-minute call with Madhuranjan Kumar and we will map the fastest path to it for your specific business.
Book your call →
Madhuranjan Kumar
Madhuranjan Kumar brings 20 years of performance-marketing experience and has managed over $200 million in Facebook ad spend for brands across the United States and beyond. His expertise spans the full modern marketing stack: Meta, Google Ads, TikTok, email automation, CRM, and the websites that hold it together. At AI DOERS he turns that track record into lead-generation systems for businesses across every industry.